Monday, December 31, 2018

3-D gift tags

While perusing on Pinterest I saw 3-D gift tags (check my inspiration out here) and decided I wanted to create my own.  The Rectangle Stitched Framelits Dies in the upcoming 2019 Occasions Catalog from Stampin' Up! were the perfect fit for my masterpiece!  Well, masterpieces.  Most of the framelits and stamp sets are from the Stampin' Up! 2018 Holiday catalog, unless otherwise noted.

Hope you enjoy the tags and get some inspiration of your own!


Waterfront stamp set (annual catalog), Detailed Deer framelits


Farmhouse Christmas stamp set


First Frost Stamp Set, Frosted Bouquet Framelits Dies, Christmas Pines stamp set (annual catalog)


Peaceful Noel Stamp Set


First Frost Stamp Set, Pretty Pines Thinlits Dies (annual catalog)

Sunday, December 30, 2018

Holiday boxes and tags

I have another quick project to share.  My youngest is in high school so I decided to send her with gifts for the teachers.

The sprig punch from the Stampin' Up! 2018 Holiday Catalog is one of my favorite punches ever!  While I love the intricacies of the die cuts, the punch is still a quick and easy way to add an element of flare in seconds.  I used the sprig punch on almost everything I made this holiday season.  Such a fun embellishment.

I loved making these tags and they worked great with the silver mini gable boxes from Stampin' Up!


And, the gift box fit nicely with the challenge sponsored by Just Add Ink Challenge #439!


It's been so long since I played along with a challenge!  Glad to dust the blog off.  Might need to spruce it up a bit soon!

Saturday, December 29, 2018

2018 Handmade Christmas Card

This year I decided I wanted to make our family Christmas card.  Between working full-time, traveling for work and going back to school, I haven't had much time to papercraft.  However, when I saw the Buffalo Check background stamp in the 2018 Holiday catalog from Stampin' Up!, I could not resist!

And, of course, my design ended up not being a simple one.  I went all out!  I used a lot of different tools, which helps me justify the purchases ;0).

This card was not for the faint-hearted.  It took my hours and hours of fussy cutting (the wood slices), die cutting (lots of Big Shot time while watching the Hallmark channel) and stamping (again, more Hallmark Channel and movies).  I made 120 cards.  I love how they turned out and have gotten a lot of compliments on the design!


Hope your holidays were enjoyable!

Friday, December 28, 2018

And more alpine tags

I wanted to share more gift tags using the alpine sports dies from the Stampin' Up! 2018 Holiday catalog.  I made 50 of these tags!


 I decided to make them more of a winter theme than Christmas.  


Another lovely tag using my favorite products from the Holiday catalog!  
First Frost Stamp Set and die; Alpine adventures stamp set and Alpine Sports dies; sprig punch; snowflake from November 2018 Snowflake special release die

Note: ornate tag topper punch is a retired item from Stampin' Up!


Alpine Tags

Every year I buy my nieces and nephews a small gift for Christmas.  I like to make personalized tags for them as well.  This year I used the Alpine Adventures Stamp Set from the Stampin' Up! 2018 Holiday catalog.  The snowshoes were easy enough for multiples and I hand-trimmed them instead of die-cutting.


Lastly, I personalized each one using the Make a Difference Stamp Set from the 
2018-2019 Stampin' Up! Annual Catalog.


I ended up mounting each tag onto heavier cardboard so they could save them and use them as a Christmas Ornament.

It was a great project and I had fun making them.

Thursday, December 27, 2018

Gnome for the holidays

I love the scandanavian gnomes and have been stalking them on Pinterest for years.  I finally decided to make one of my own using my own medium, paper!

The first one I made was a self-closing gift baggie.  I love these gift baggies, so simple to make and they look great.  I found a tutorial for the boxes on YouTube from Pootles Papercraft.  She has some great tutorials!  The baggie can be found at: https://youtu.be/hlxKaoShTqg (Stampin' Up! Scallop Topped Self Closing Baggie).

I made the gift bag from a piece of crumb cake cardstock that was 5.5" tall.  Once the bag was glue together, I freehand cut the hat and made a hat from the Festive Farmhouse Designer Series Paper from the Stampin' Up! 2018 Holiday Catalog.  I made the beard from the braided linen trim, also in the Stampin' Up! 2018 Holiday catalog (and carrying over into the spring).  I hand-trimmed the nose starting with a 3/4" circle.


I had so much fun with the gift bag that I decided to make tags.  Below are some pictures of the tags I made.  I used 2" x 4" cardstock and hand-trimmed the hat.  


I love how the cable knit hats turned out!  I used the cable knit embossing folder (Stampin' Up! Annual 2018-2019 catalog).  For the trim I wet the embossed cardstock and bent the cardstock slightly to give it a little curve.

Hope you enjoyed the gnomes!!  I am very happy I finally made my own!

Happy Wednesday.


Sunday, February 4, 2018

Showcasing Two Different Techniques

A quick post to share two very different cards with you today.

The first card uses a watercolor effect to create the background.  

To create the background used a watercolor technique I have grown to enjoy.  I dabbed ink from Island Indigo, Fresh Fig and Night of Navy ink pads onto a large plastic ziploc bag and spritzed it with water to let the colors blend and float.  Then I dabbed whisper white cardstock onto the wet ink to create the background effect.  I heated the cardstock after 1 application to dry the ink and water.  Then I added more ink to the cardstock in the same way to add more color and fill in the background until I was happy with the effect.  

Once the background dried I added some die-cut and punched circles and the greetings.  The greetings are Sale-a-bration items offered by Stampin' Up! from now until March 31st 2018.  I received these items free, the Amazing You clear-mount stamp set and the Celebrate You Thinlits dies, when I purchased $150 in Stampin' Up! product (total).  Such great fonts in these items.  I already created a few different items with the thinlit dies.


The second card is ALL die-cuts, no stamping at all!  

I used the Painted with Love Designer Series Paper (Stampin' Up! 2018 Occasions Catalog) and the Sweet and Sassy Framelit Dies (Stampin' Up! 2017-2018 Annual Catalog) to create the hearts.  The greetings are from the Celebrate You Thinlit dies (2018 Sale-a-bration item) as well as the Lovely Words Thinlit Dies (Stampin' Up! 2017-2018 Annual Catalog).  I added a little gold mini sequin-trim ribbon behind the smaller heart and that was it.  The mat is Powder Pink cardstock embossed with the Polka Dot Basics Textured Impressions Embossing Folder (Stampin' Up! 2017-2018 Annual Catalog).  Cardstock colors in this card are Powder Pink and Rich Razzleberry.


Thank you for visiting and hope you enjoy your day!

Thursday, February 1, 2018

Petal Palette Cards


A quick post to show you some cards I made using the new Petal Pallette Clear Mount Bundle from the Stampin' Up! 2018 Occasions catalog.  

Petal Palette Clear-Mount Bundle

I really love this bundle, one of my favorites from Stampin' Up! this year.  I made two different cards, similar layout using different techniques.

For the first card I stamped the images using Memento and colored in the flowers and leaves using the Stampin' Up! Blendabilities.  I love the effect and that there are no lines when you color.  
I stamped the bird with Fresh Fig ink onto Sweet Sugarplum cardstock and then diecut it using the matching thinlits.  I added some Wink of Stella sparkle to the to give it a little flare.  


For the second card, I diecut the leave image into cardstock and used it as a template for adding the Shimmery White embossing paste to create a sparkly background.  Then I stamped the flowers and leaves and bird using Memento ink and colored the leaves and flowers with the Blendabilities.  I added the Wink of Stella to the bird and decided to keep it monochromatic to let the flowers stand out.  The greeting is my favorite part!  It comes from the Happiest of Days stamp set from the 2017-2018 Annual Catalog.  I love the mix of fonts in this greeting.  I added a little Silver Baker's Twine behind the flowers and adhered to the card base with dimensionals.


Hope you enjoyed the cards and got a little inspiration from them.  

All the best to you!

Tuesday, January 30, 2018

Unicorn Magic in a Shaker


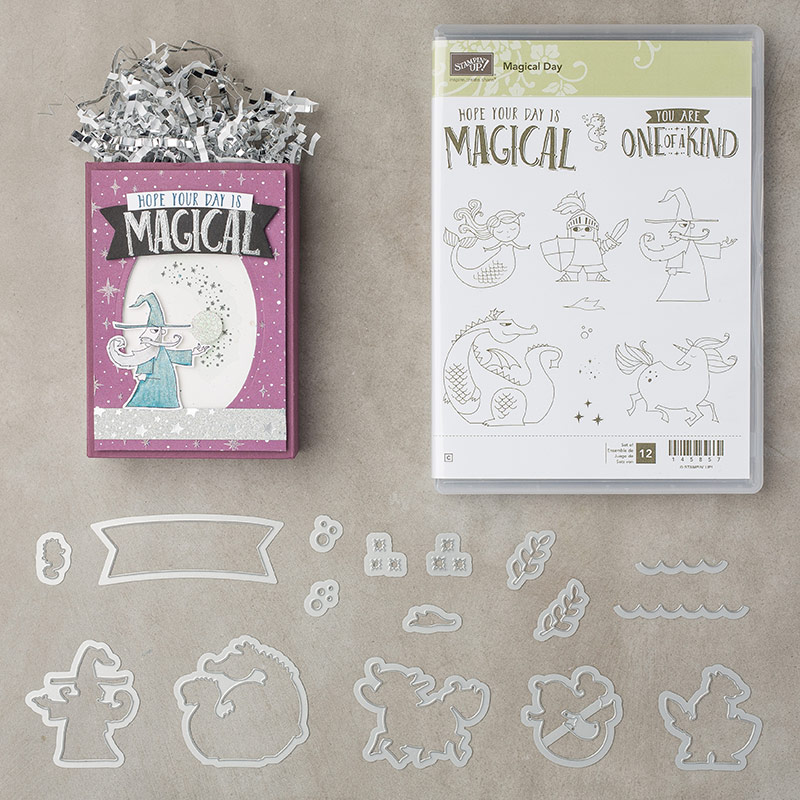
My niece's birthday is in early February so I decided to make her a card using the Magical Day Clear-Mount Bundle from the Stampin' Up! 2018 Occasions Catalog.


Magical Day Clear-Mount Bundle

I decided to make a shaker card using the Irridescent Sequins Assortment.  I love these colors and decided to use them in the card.  I stamped the unicorn onto whisper white cardstock and then colored in the mane and tail with Stampin' Write markers in Calypso Coral, Pool Party, So Saffron, Pear Pizzazz, Pool Party, Powder Pink, and So Saffron.  Then I covered the mane and tail with Wink of Stella to give it a little sparkle.  I decided to fussy cut the unicorn since my color was a little messy (and I needed some scissor therapy).  Otherwise, I would have used the matching thinlit!


For the greeting I stamped part of the greeting onto the card base and then stamped the "MAGICAL" part onto Pool Party Cardstock using Versamark and heat embossed with silver embossing powder.  I added some mini sequin trim and some Powder Pink ribbon threads (pulled out of the Powder Pink 3/8" shimmer ribbon) beghind the greeting for some flare.


The oval was die-cut using the largest oval from the Stitched Shapes Framelits Dies. 


 I had a bit of a hard time with assembling this card.  The first time I adhered the top of the card to the card base I ended up with a spare piece of cardstock in the window with the sequins.  I had to disassemble the card and re-add the foam adhesive strips around the oval.  The second time I adhered the top of the card to the base I complete forgot to add the sequins.  UGH!  So, had to disassemble the card yet again.  This time I remembered the sequins, without any stray garbage lying around.  Guess I need to clean my desk off!  Luckily I was able to keep the top part of the card and just replace the base each time.
Whew.  The card is in the mail and should arrive in plenty of time for her birthday!

Happy day and hope the card inspired you (and the experience I had did not scare you).  I love the shaker cards and they aren't too hard to make at all, as long as you pay attention.

Sunday, January 28, 2018

Valentines Ensemble

A quick post to share something I was able to work on this weekend.  With school and work, I treasure the time I get to make cards.  I actually find I need to make cards in order to keep my sanity.  Of course, time is not that hard ti find as it seems as I do spend an AWFUL amount of time on Facebook  and Pinterest, mostly watching what other Stampin' Up! demonstrators are able to create with their talents.

Inspired by so many talented people out there, I decided to focus on some Valentine's for my sweetie.  We don't really celebrate Valentine's Day in a huge manner, although my husband usually makes an effort to get a card, flowers and a treat.  His efforts make me feel guilty since we always say "don't do anything", so I don't and he does.  This year I decided to up my game since I have been traveling so much and distracted with many things.

I purchased the Sure Do Love You Clear-Mount bundle as well as the Heart Happiness Photopolymer Stamp Set from the Stampin' Up! 2018 Occasions Catalog and wanted to make something with these sets.

 Sure Do Love You Clear-Mount Bundle

Heart Happiness Photopolymer Stamp Set

I ended up with a cute treat box (which I will fill with his favorite, Reese's Peanut Butter cups) and a matching card.


I used a color combination of Powder Pink, Flirty Flamingo and Berry Burst.  I colored some Shimmery White Embossing Paste with ink from the Berry Burst and Powder Pink reinkers and used the small hearts from the Mini Treat Bags thinlits dies (Stampin' Up! 2017-2018 Annual Catalog) as the template.  

The "Love You greeting is from the Bloomin' Love Photopolymer Stamp Set (Stampin' Up! 2017-2018 Annual Catalog).  


Can't wait to surprise him with these items!

Happy days to you all!