Sunday, August 20, 2017

Paper Craft Anniversary

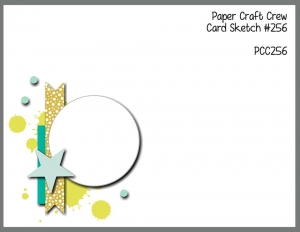
I needed an anniversary card for my husband's parents so I used the Paper Craft Crew Challenge (PCC256) for this week for some inspiration.

Paper Craft Crew Card Sketch Challenge 256. Come play along! #papercraftcrew #stampinup #sunnygirlscraps #papercrafting #papercrafts #stamping #stamps #papercraft #rubberstamp #rubberstamps #artsandcrafts #hobby #crafts #craftastherapy #createeveryday #happymail #snailmail #creativelifehappylife #handmadeisbetter #craftsposure #creativemess #christiancreative #becreative #instagood #crafters #diy #smallbusiness #cardmaking #cardmaker #washitape www.papercraftcrew.com www.sunnycraftcrew.com

I pretty much stayed close to the sketch, with a few substitutions.  All supplies I used came from the Stampin' Up! 2017-2018 Annual Catalog.  


The color combination is Peakaboo Peach, Soft Sky, Gold and Whisper White.

Instead of the splatter I decided to try to use a watercolor technique to add the color to the card.  For this technique I pressed the Peakaboo Peach stamp pad onto ziploc bag, spritzed it with water and then dabbed the edge of a piece of whisper white cardstock into the ink.  I only made a small spot so that the ink didn't cover too much of the paper.  I love the various watercolor techniques out there so I continue to practice and try new ways to get the watercolor effect.

I used one of the Eastern Gold Vinyl Stickers for the background and Soft Sky 3/8" Classic Weave Ribbon which I folded to create a ruffled effect.

The greeting is from the Beautiful Bouqet photopolymer stamp set inked with Basic Black and stamped onto WHisper White cardstock.  I punched it with the 1-3/4" circle punch.  I punched another 1-3/4" circle from gold foil cardstock and glued it behind the greeting.

The heart was die cut from Wood Texture Designer Series Paper Stack using the heart from the Wood Crate framelit die.

And finally, I added a few Metallic Enamel Shapes gold dots.

The card came together pretty nicely and it is already in the mail (will be late since their anniversary is tomorrow).

Hope you enjoyed the card!

Sunday, August 13, 2017

Tomorrow is a gift

A super quick post!  I made some goody bags for a colleague at work who retired.  He was a very sweet man and I hope he gets to enjoy his family (and super cute grandkids) as much as possible!


I used the Playful Backgrounds stamps to add some fun images a white paper bag (purchased on amazon).  The color combination is Tangerine Tango, Daper Denim, Tempting Turquoise and Lemon Lime Twist.

The chair and greeting is from the Colorful Seasons Photopolymer Bundle.

All products are from the Stampin' Up! 2017-2018 Annual Catalog.

Enjoy your today and tomorrow!

Friday, August 11, 2017

Cotton Balls and Birthdays

Hey all, I am so excited to show you a card I created.  It was inspired by the newer farmhouse style decorations and various pics I saw during my quick stress relieving moments on Pinterest.  Here was one of the inspirations for my card.  I am loving the cottonball stems!!  

Farmhouse grapevine cotton boll wreath with by Twentycoatswreath

Since Stampin' Up! has the mason jar stamp set and dies I decided to build my card using the mason jar die and the new Beautiful Bouquet Photopolymer stamp set in the Stampin' Up! 2017-2018 Annual Catalog.  Here's the card!


I just love how this turned out.  I was so giddy when things started falling together (after a sleepless night when my mind started whirring with ideas).

A few tips for how I made the card.

The cotton ball stems were made using the whisper white mini pom-pom trim (recently retired from Stampin' Up!) and the stems and the 5-petal flower bunch die from the Bouquet Bunch framelit dies.  I die cut both the stems and the flowers using Early Espresso cardstock.  I cut the flowers out individually and trimmed them a little so the petals were thinner.  I curled the petals using my fingers and so they cupped a pom-pom, then I glued the cupped flower to the white pom-pom using Tombow glue.   You can kind of tell in the pic below that I used various widths of the flower petals, I didn't need to cut them uniformly.


The leaves were also die cut from the same Bouquet Bunch framelit dies.  For the long leaves I die cut them using  Pear Pizzazz cardstock and then I sponged some Emerald Envy ink on all but the top part of the leaf to give it a dual color effect.  The other leaves were die cut using Wild Wasabi and Garden Green.  

The mason jar was die cut from vellum cardstock and I tinted it by sponging it with Soft Sky ink.

The background was made using the new Pinewood Planks Dynamic Textured Impressions Embossing Folder.  I used this folder to emboss a piece of Whisper White cardstock.  Then I used an aquapainter to add some Sahara Sand ink to the pine to give the wood the darker white-washed color.

The rooster is from the Wood Words clear-mount bundle (Stamp and coordinating die) and the sentiment is from Happy Birthday Gorgeous photopolymer stamp set.

Everything except the whisper white pom-pom trim is from the Stampin' Up! 2018-2018 Annual Catalog.  I am glad I was able to use so many different products to make this card.  It's nice when I can tell my husband that I am using the things I buy ;0).

Since the card met a few sketch challenges I added my card to the following challenges:

Paper Craft Crew Challenge PCC255

SU! Only Challenges SUO Challenge #180 - Happy Birthday

Hope you enjoy the card!

Thursday, August 10, 2017

Freshly Made Birthday

A quick post today to showcase a card I made for Freshly Made Sketches #300.


I actually made a different card and decided to change it up so it fit the challenge better.  All supplies are from the Stampin' Up! 2017-2018 Annual Catalog.  I started with a Crumb Cake card base and stamped the flowers from Touches of Texture stamp set.  I colored the flowers in with the white gel pen and the leaves with pear pizzazz stampin' marker.  Then I die cut the bird from the Birds & Blooms Thinlits Dies from Pool Party cardstock.  I used my aqua painted and Tranquil Tide ink pad to add some contrasting color to the bird.  


Then I stamped a greeting from the Best Birds Photopolymer Stamp Set using Early Espresso ink onto Whisper White cardstock.  I die cut the circle using Stitched Shapes Framelits Dies and then mounted it to a punched 2" circle from Tranquil Tide cardstock.  I cut the side off a length of Tranquil Tide 1/2" finely woven ribbon and pulled a few strands of the thread out and mounted it on the back of the circles using glue dots.  I added some mini silver sequin trim as well for a little bling.


Here is the original card I did as well.  The greeting came from the Ribbon of Courage stamp set and I used both Pear Pizzazz and Old Olive markers on the leaves for some contrast.  Otherwise, everything else is the same.


Enjoy!


Thursday, July 27, 2017

A Fresh Birthday Card

I have been wanting to use the new embossing paste in the Stampin' Up! 2017-2018 Annual Catalog. I love the 3-D effect the paste adds to the card.  For my first attempt I decided to go with the natural look, white.  I know you can use a reinker and color the paste.  I like the monochrome effect of the white on white though so I started with there.  


I die cut the rhombus shapes from the Eclectic Layers Thinlits and used that as a stencil.  Once the paste dried I cut out some flowers and leaves using the same Eclectic Layers thinlit set.  The flower uses Fresh Fig (one of the new 20017-2018 In Colors from Stampin Up!) and Perfect Plum.  

The greeting is from the Better Together wood mount stamp set.  I love this set as it gives a great variety of greetings to cover various occasions.  I used the Stitched Shapes Framelits die to cut the greeting out and added some mini silver sequin trim as well as some whisper white and fresh fig 1/8" sheer ribbon.

Hope you enjoyed the card!

Tuesday, July 25, 2017

Eclectic Inspiration

Today I wanted to showcase a card I made using inspiration from a blogger who talked about card layouts.  Unfortunately I can't find that tutorial now, but the card below was my take on the information.  She did not use Stampin' Up! materials for her card.  I decided to use the Oh So Eclectic bundle from the Stampin' Up! 2017-2018 Annual Catalog for my version.  I love the various stamps in this set and it worked well this this card.  The greeting is from the Ribbon of Courage clear mount stamp set, also in the 2017-2018 Annual Catalog. The colors also work well together, Tempting Turquoise, Melon Mambo and Old Olive with Basic Black and Whisper White.

If I find the blog I will definitely post it as I want to give credit where credit is due.


Thanks for stopping by!


Monday, July 24, 2017

Back for a short stent, for now...

I just realized it has been almost a whole year since my last blog post.  A lot has happened in that time, most of which took a lot of time away from this passion of mine.  However, I have a few weeks available, sort of, so between living the rest of my life, I decided I would post a few things I have made.

Hopefully as I get used to working full-time, being a part-time student and a mother of 3 teenagers, one of which will start college in 4 weeks, I will continue to have time to papercraft.  My love for the craft has not changed, only the time I have available.

To start, I thought I would post a few cards I made for a stamp camp I held in June when the Stampin' Up! 2017-2018 Annual catalog went live.  

This first card uses the Wood Words wood-mount stamp set from the Stampin' Up! 2017-2018 Annual Catalog.  I found a card on Pinterest (See blog here) from another Stampin' Up! demonstrator and I loved what she did with the colors so I changed it up a little.


The next card uses the great new Happy Birthday Gorgeous photopolymer bundle.  The color scheme is Smoky Slate and Lemon Lime Twist.  I love the new Lemon Lime Twist color, one of the fabulous 2017-2019 In Colors released this year!!  And the ombre ribbon in this same color is just adorable and so easy to bend and wrap.  I love that ribbon can be used for more than just bows!!  I also tried playing with a watercolor wash in the background.  This is a new technique for me so I need to continue playing to perfect the effect.


The next card is a simple one and showcases all 5 of the Stampin' Up! 2017-2019 In Colors.  They are so beautiful and I love how well they coordinate with each other, as well as the rest of the colors in the Stampin' Up! collection.  I also used the Eastern Beauty stamp set and the Eastern Medallion thinlits.  A simple card and can easily be dressed up even further.


The final card for today uses a stamp set from the previous Stampin' Up! catalog, Jar of Love.  I found a few people on Pinterest who made a wreath using the leaves and added some flowers (I linked to my Pinterest page with over 4500 pins of cards so I could not easily find the one I was looking for to showcase my inspiration).  I loved this idea so I decided to try a version of my own.  I stamped the leaves (only inked the stamp just below where the leaves stopped so I did not get the entire stem inked up) with Pear Pizzazz and Old Olive.  It's pretty simple once you get the placement of the leaves correct.


That's all for today.  I will post a few more cards over the next few weeks.  I have been able to create here and there, just not post!

Happy day to you all!