Monday, November 24, 2014

Inspiration from Stampin' Celebration!

Time for another Stampin' Celebration inspiration challenge.  I love, love, love these inspiration challenges.  Great way to think outside the box sometimes! Perhaps colors you wouldn't normally put together or a unique way to use stamps and supplies you have.


When I saw this month's inspiration I was so excited!  Loved the colors, loved the images.  I had a hard time limiting my options.  But, in the end I came up with something I enjoyed creating!

For me, inspiration came in the form of the colors (grays and browns with a touch of red) and the door.  Love the door!  So I decided to make a card using the Holiday Home photopolymer stamp set (Stampin' Up! 2014 Holiday Catalog) for the main images.  I also decided to pull out my aqua painter.  There were so many shades of grays and browns that I knew I had to use watercolor to get the right blend and shades of color.  Watercoloring is not something I do all the time so this was a bit out of my comfort zone, but certainly something I felt I needed to try!


For the background I used the Hardwood background stamp set, versamark on smoky slate cardstock and heat embossed with black embossing powder.  Then I took basic gray ink and my aqua painter and shaded in the hardwood design to give it some darker shading.

For the houses, I stamped them on watercolor paper using black staz-on ink. Then I used my aqua painter and smoky slate, basic gray, sahara sand and soft suede to color in the houses.  I haven't watercolored much so I stamped several of each house so I could practice and use the houses with the right effect.

I wanted to try to create the white fluffy wreath so I stamped the little wreath image from the Holiday Home stamp set using versamark and heat embossed it with white embossing powder. The effect was nice but the wreath didn't really show up all that well.  Here is one of the houses I didn't use on the card, showing the wreath heat embossed.


So, I decided to try making wreaths with white filter paper and the smallest flower on the boho blossoms punch.  Viola!  It worked beautifully!  I punched 4 filter pages at a time and ended up using 8 pieces in all for each wreath,  I used a mini brad to keep the wreath together, the end was colored brown using my blendabilities marker to keep with the browns theme.


A touch of red with the greeting and a pretty card is ready for the gift giving season!

I love how this card came together and hope this has inspired you to do something that might be out of your comfort zone.  You never know what you will come up with!

Thursday, November 20, 2014

So Grateful For You

Thought I would post another card we made at my Thankful for You stamp camp.  This one was the "easy" card.


This card uses products from the Stampin' Up! 2014 Holiday catalog.  I used the Color Me Autumn Designer Washi Tape on Very Vanilla cardstock and created the rows of color.  Next, I stamped the "so grateful for you" greeting from the Holiday Home stamp set using Cajun Craze classic stamp pad.  Next, the house image was stamped onto Crushed Curry cardstock using Blackberry Bliss classic stamp pad.  I used the Homemade Holiday Die Set to cut out the house.  Much faster than fussy cutting!  You can get both the Holiday Home stamp set and Homemade Holiday framelits as a bundle with a 15% savings.

The leaves are from the Fun Fall framelits, one is cut using Cajun Craze cardstock and the other using Crushed Curry cardstock.  I stapled the leaves and the house to the card front using the handheld stapler.  Absolutely no glue/adhesive needed for this card!  I think this is a first for me! 

Looking back, this definitely was the easiest card of all that night.

Homemade Holiday Framelits DiesColor Me Autumn Designer Washi TapeFun Fall Framelits DiesHandheld StaplerHoliday Home Photopolymer Stamp Set
Cajun Craze Classic Stampin' PadBlackberry Bliss Classic Stampin' Pad by Stampin' Up!Very Vanilla 8-1/2" x 11" Card Stock

Wednesday, November 19, 2014

Grateful for You

A quick post today to show you one of the cards we made at my Thankful for You stamp camp last week.


For this card I used the tree from the Nuts About You hostess stamp set from Stampin' Up!.  The tree was stamped using Early Espresso ink on Crumb Cake cardstock.  I then punched out 3 Blushing Bride flowers using the flower from the Itty Bitty Accents Punch Pack and adhered them to the tree using a dab of Tombow glue.  Some basic pearls in the center of each flower helped give them a little dimension.

The greeting is from the Merry Everything (2014 Holiday catalog) stamps set and was stamped using Versamark and heat embossed with Blushing Bride embossing powder.

The card base is Blushing Bride cardstock with a middle of Chocolate Chip cardstock as an accent.

Have a great day!

Merry Everything Clear-mount Stamp SetItty Bitty Accents Punch Pack by Stampin' Up!Nuts About You Clear Stamp Set by Stampin' Up!Versamark PadBlushing Bride Stampin' Emboss Powder by Stampin' Up!Pearl Basic Jewels EmbellishmentsBlushing Bride 8-1/2 x 11 Card StockCrumb Cake 8-1/2 x 11 Card StockEarly Espresso 8-1/2 x 11 Card Stock


Monday, November 17, 2014

Bokeh Of Cards

I mentioned yesterday that I volunteered to demonstrate the bokeh effect at our monthly Stampin' Up! demonstrators meeting, Stampers in Stitches headed by Glenda Travelstead.  I love this effect and it is so fun to do!

The term comes from the Japanese word boke (暈け or ボケ), which means "blur" or "haze", or boke-aji (ボケ味), the "blur quality". Iphotographybokeh (boh-kay) is the aesthetic quality of the blur produced in the out-of-focus parts of an image produced by a lens.[3][4][5] Bokeh has been defined as "the way the lens renders out-of-focus points of light".[6] 

Here's an example of this effect in photography.


When I volunteered to demonstrate this technique I had two thank you cards that I created this summer.  The pressure was on to create a few more samples to demonstrate the various ways to create the effect.  Today I am going to post the rest of the cards I demonstrated or had as a sample.  Well, most of the cards I had as samples.  Turns out I gave a few away without taking a picture. Ooops.  

In stamping, this technique is primarily achieved on cardstock using circles.  I like to use different sized circles, but you can use the same size as well.  The main thing you need is a template for the circle.  I created my template with a window sheet and the circle framelits, the 2nd smallest and 4th smallest circles. For the smallest circle I either used a sponge dauber or the 1/2" circle punch. I found that some punches do not cut through the window sheets too well, just a heads up.  You can also use other shapes; stars look great!

A link to a YouTube video of the technique is here.  

Yesterday I posted a card I made using one of the backgrounds I demonstrated at the meeting.  That card turned out great!

Here are the other cards I showed at the meeting.

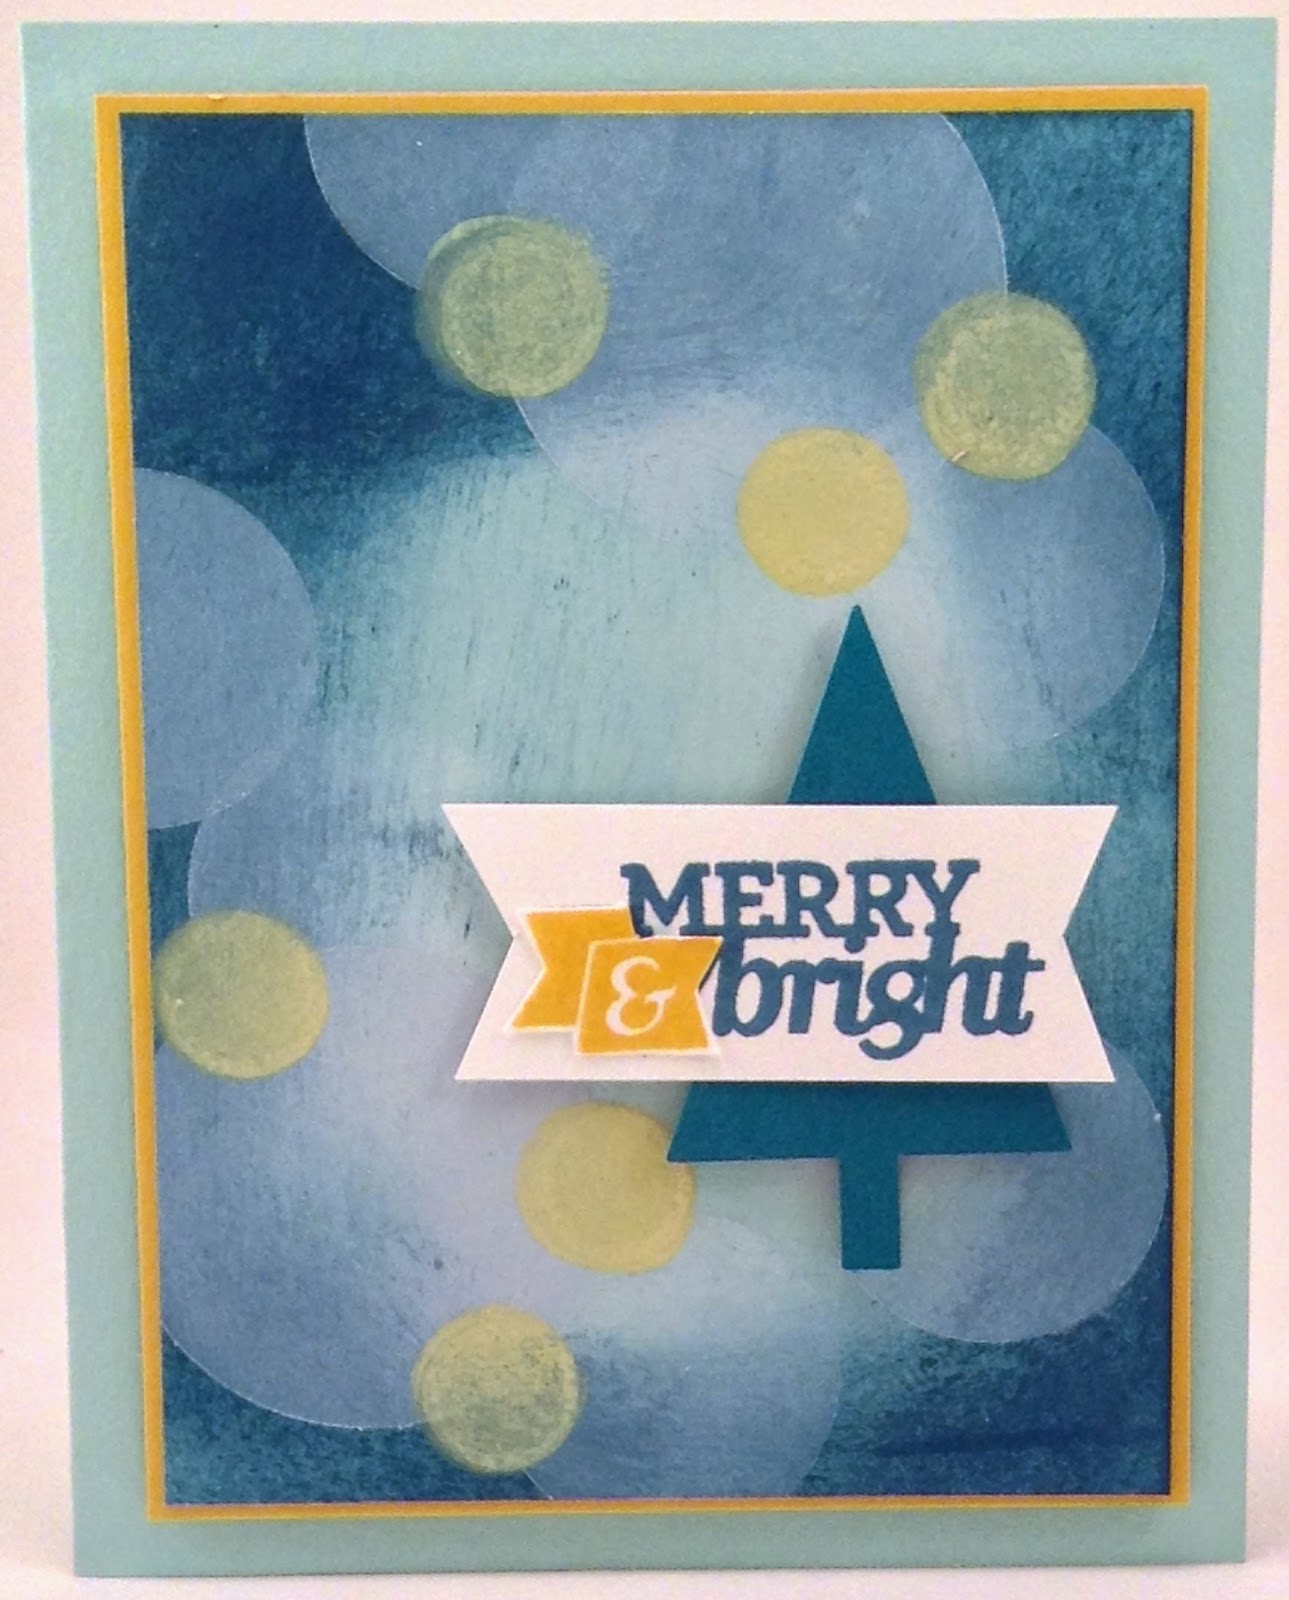
For The Merry & Bright card I started with a base of Pool Party cardstock and used a sponge and Island Indigo stamp pad to shade in the edges of the cardstock, leaving the middle uncolored.  It helps to spray the sponge with a little water, it makes the ink easier to "spread" around the cardstock.  Once that was dry, I took whisper white craft ink and a sponge and using a circlular motion, sponged the whisper white ink over the card first with the large circle and then the medium sized circle.  For the smallest circle, I mixed a few drops of whisper white crafk ink and crushed curry reinker together.  I then applied the ink with a sponge dauber.  The stamp set for the greeting is the Stampin' Up! Christmas Bliss photopolymer stamp set.  I liked the greeting with this background!


This next card uses classic ink for the circles.  I used a background of Soft Sky cardstock and created circles with Soft Sky (largest circle), Pool Party (medium circle) and Island Indigo (smallest circle).  I used a different sponge for each color to avoid getting the wrong color ink in the stamp pad.  Just ink up the spomge and use a circle motion to color in the circles.  The greeting is from the Circle Card Thinlits Die.  I hand cut the arrow to fit the greeting.  


This birthday card uses the same technique as above, just a different color combination (Pink Pirouette, Wisteria Wonder and Strawberry Slush on Pink Pirrouette cardstock).  The cake is from the Stampin' Up! hostess stamp set called Life's Adventure.  I used the Stampin' Up! markers to color the cake and some basic rhinestones to add a little bling to the sparkler on top of the cake.


The background for this next card was created using the Stampin' Spritzer filled with alcohol and about 15 drops of basic gray ink from the reinker.  I sprayed a piece of whisper white cardstock with the basic gray alcohol mix and then the other half with a mix of alcohol and crushed curry.  Once it was dry I used whisper white craft ink to make the circles on the card.  The greeting is from the Many Merry Stars stamp set.  The design on the Smoky Slate star is also from this stamp set and was stamped using versamark and then heat embossed with crushed curry embossing powder.  The Many Merry Stars stamp set is a new set in the 2014 Holiday Supplement catalog.  This stamp set coordinates with the Stars framelits!

I have a few more backgrounds I created using this technique.  I will post them as soon as I create a few projects with them.

Perhaps you can use this technique to make a few fun projects this holiday season!

Sunday, November 16, 2014

Celebration! A New Years Bokeh

I have a card to show you that came together through various means!  I was so excited when I realized what could be!

First, I was demonstrating the bokeh technique at the Stampers in Stitches monthly meeting this weekend.  Also know as the SISers.  This group is lead by Glenda Travelstead, one of the demonstrator leaders with Stampin' Up!  I don't get to attend many meetings so when I am able I take full advantage.  This time I decided to step up and demonstrate a technique.   I have had so much fun with the bokeh effect so I offered to demonstrate it at the meeting.  Of course, once I volunteered the pressure was on to create some samples.  Watch for that post on Monday!

Anyway, back to this card, while at the meeting, some one mentioned that the specific bokeh effect card I created would look great as a new years card, with the Making Spirits Bright Stamp Set from the Stampin' Up! 2014 Holiday catalog.  So that was the start of the card.

Next, I was looking at The Friday Mashup! challenge #186.  It was a sketch challenge mashed with creating a project using a "surprise element, something you wouldn't expect to see on a card".  

The light bulb went on and I got busy pulling it all together!

So here is the card without the surprise element.  You can see the bokeh effect on the background.  
I started with a piece of whisper white cardtsock and sprayed it with a solution of basic gray reinker and alcohol and crushed curry reinker and alcohol in Stampin' Misters.  Then I took various sizes of circles and stars and used whisper white craft ink to create the bokeh effect.  I love the way it turned out!  Really pretty.


I added the champagne glasses and greeting.  I even used iridescent ice on the champagne inside the glasses!

Now for the surprise!  


A while back I pinned a blog post on Pinterest that explained how to easily cut cork from wine bottles by steaming the corks for a few minutes.  This was the perfect reason to try this technique!  It worked like a charm by the way!  

I like how this card turned out; the color scheme is perfect and the cork fits nicely.  I hope you enjoy the card and that you are inspired for your upcoming celebrations!

Watch for more bokeh examples tomorrow!  

Wednesday, November 12, 2014

Grateful Wreath

Another card for my Thankful for You stamp camp on Friday.  This card uses the Wondrous Wreath photopolymer stamp set from the Stampin' Up! 2014 Holiday Catalog.  What is great about this stamp set is that it has a matching framelit die set!  Most of my stamp campers love it when there is a matching punch or die to help cut things out.  Fussy cutting is fun, but tedious and if there is a punch or die, there are many happy cheers coming from my basement on stamp camp night!

The wreath on this card uses Hello Honey, Tangelo Twist and Cherry Cobbler.  If you haven't used this stamp set yet, there is a trick!  The stamps and dies have a little tab that helps you keep everything aligned.  Just keep the tabs in the same place for each stamp and die (I point  down or south).  If you do that, this wreath is really simple and easy to make!  And, it looks great with minimal cutting effort!


The banner behind the wreath is from the Party Pennants Bigz L die and embossed with the woodgrain textured embossing folder.  To top off the wreath I made a fork bow (normal sized fork) using cherry cobbler seam binding and added a greeting using the Good Greetings stamp set I earned for free last month!

A simple, pretty card with a lot of effect!

Hope you find clever ways to show your friends and family how thankful you are for them!


Monday, November 10, 2014

Grateful Inspiration

Time for a new sketch challenge from Stampin' Celebration - SC91!  This is a great design with lots of elements to play with!  I love the creative items the design team came up with.  It's always fun to see how others interpret the designs!


For my interpretation, I pretty much stayed true to the fall theme suggested;0). I have mentioned before that I really love the For All Things stamp set so I had to use it for my card. I am having a Thankful for You Stamp Camp on Friday so I thought this card would be perfect for my event.  

The color combination is from the Color Me Autumn Designer Series Paper (Stampin' Up! 2014 Holiday Catalog).  The base of the card is Mossy Meadow with a Soft Suede background embossed with the woodgrain textured impressions embossing folder.  The 2 rectangular papers behind the leaf is from the Color Me Autumn DSP.

The 3 leaves are from the For All Things stamp set, stamped with Pear Pizzazz with a background of Pear Pizzaz die cut with the Starburst framelit dies.  A linen thread bow accents the green leaves.

The cajun craze leaf is cut using the Big Shot and the Autumn Accents Bigz die with Blackberry Bliss stitched satin ribbon stapled behind leaf and circle.

I am one more step ahead in creating cards for the Thanksgiving season!  Now, I just have to remember to get them in the mail!


Saturday, November 8, 2014

A winner and a Sparkly Mash-Up

Wow, what a great week I have had.  First, I found out that my card was a winner in the Papercrafts World Card Making Day Challenge!  I submitted two cards, one for the Hello/Thinking of You category and one for the Christmas category.  The card that won was in the Hello/Thinking of You category!  I was so excited I literally screamed!  My family looked at me like I was odd (nothing new).  Anyway, a can't post the card just yet.  It will be published in the April 2015 issue of Paper Crafts and Scrapbooking magazine.  Can't wait to share my winning card!

The next bit of news was that I was the Mashup Glamette for my submission to The Friday Mash-up last week!  A great way to be recognized for the box I created for their challenge!


To celebrate, I decided to create another project for the Friday Mashup #185 - Let's Make it Sparkle!


I am having a Thankful for You Stamp Camp on Friday and I needed one more card!  I loved the color combination in the Friday Mashup challenge, Blackberry Bliss, Garden Green and Island Indigo along with the Diamond Dust technique. A great combination to get the creativity flowing.  

I have to admit, it took a me a while to figure out which images to use.  I had already picked a sketch. I wanted to create something using the Fab Friday sketch challenge #53.  I was a little late in creating the card for the actual challenge, but I liked the sketch and decided I needed to create something using the sketch.  


So with this sketch in mind and the need for the sparkle, when I came across the Summer Silhouette stamp set new I had a winning combination!


The greeting is from Lots of Thanks.  I used the Diamond Dust technique on the circle with the leaves and flowers.  I actually embossed the circle and the flowers separately with iridescent ice.  Then I fussy cut the flowers and glued them to the leaves on the circle with the Tombow multipurpose glue.  This helped give the flowers a little dimension (very subtle).  


Anyway, I am excited and thankful for all the recognition!  It is great to be acknowledged for something that I love to do, even though it's not something I get to do all the time!  Still have that day job thing going ;0).

Tuesday, November 4, 2014

Box of Gratitude

I am torn.  In one way I am in denial that Christmas is 7 weeks away and winter is fast approaching. In another way, I am excited and energized that the holiday season is approaching!  Either way, best not to dwell ;0).

I decided to play along with this week's The Friday Mash-up - FM184 - Put it in a Box!


I really love the For All Things stamp set in the Stampin' Up! 2014 Holiday Catalog.  It is a true favorite and I hope to use the set well after fall!

For All Things Wood-mount Stamp Set

I decided to use the gift box punch board to make a box.  I made a 2.5x2.5x2.5 box in crushed curry cardstock.  It's so easy to use the punch board!  All the directions on the board making it easy to make the box.


I wrapped the box with a piece of designer series paper Color Me Autumn, also in the 2014 Holiday Catalog.  I just love the images on this DSP.  The watercolor effect is great and so versatile!  The rosette behind the greeting is the cajun craze watercolor paper from this pack.

I added a acorn from the autumn wooden elements accessories and wrapped the box with Mossy Meadow Satin Stitched Ribbon.


The boxed is filled with autumn kisses.  A great way to share my gratefulness with those I love!

Have a great day!